The code
This blog post delves in the actual image processing and computer vision part of the Kotlin code. If you want to read setting up OpenCV or understand the rationale behind some of the decisions in this code, please read – OpenCV on Android : Part 1.
Image Processing:
The basic image processing is a pretty standard code that involves reading image in grey-scale, Canny edge detection and finding contours –
 val resultMat = Mat()
 val grayImg = Imgcodecs.imread(imgFilePath, Imgcodecs.IMREAD_GRAYSCALE)  //load in grayscale
 val edgesImg = Mat()  //for edge detection
 Imgproc.Canny(grayImg, edgesImg, lowThreshold, highThreshold)  //edges

 // thresholds and other params .....

 val contours: MutableList = ArrayList()
 Imgproc.findContours(
      smoothEdgesImg.clone(),
      contours,
      Mat(),
      Imgproc.RETR_EXTERNAL,
      Imgproc.CHAIN_APPROX_SIMPLE
 )
BTW, it is absolutely critical that you release any Mat() used in your code as soon as possible, otherwise your app will run low on resources pretty quickly. That’s one big gotcha in the Android implementation of OpenCV.
Computer Vision
The computer vision part of this app captures the paper MCQ form (bubble-sheet) with the main phone camera, processes it with OpenCV to detect all the bubbles from the MCQ sheet, detects the filled-in bubbles and maps them to relevant numbers or options to populate the UI form. Essentially, this Android app converts the paper bubble-sheet into an UI form for further processing.
Here are the relevant code snippets –
Detecting the bubble-sheet
//sort contours by their size to find the biggest one, that's the bubble-sheet
val sortedContours = contours.sortedWith(compareBy { Imgproc.contourArea(it) }).asReversed()
val approx = MatOfPoint2f()

for (i in sortedContours.indices) {
    val c = sortedContours[i]
    val mop2f = MatOfPoint2f()
    c.convertTo(mop2f, CvType.CV_32F)
    val peri = Imgproc.arcLength(mop2f, true)
    Imgproc.approxPolyDP(mop2f, approx, 0.02 * peri, true)

    if (4 == approx.toList().size) { //rectangle found
        Log.d(TAG, "Found largest contour/answersheet: ${approx}")
        break
    }
    mop2f.release()
}
//largest rect found, extract & transform it and crop answersheet properly
val answerSheetCropped = transformAnswerSheet(approx, grayImg.clone())
approx.release()  //free memory
The transformAnswerSheet() fixes orientation of the rectangle making it vertical without requiring user to capture it perfectly.
The image below shows how the bubble-sheet is detected –

Detecting all the bubbles
The bubble detection has few important points –
- It is better to detect
boundingRect()of the bubble/circle, detecting circles may not always succeed due to errors in photocopying the bubble sheet, and more importantly while filling in the bubble, the user may not fill it strictly within the circle – all these cases work better when binding rectangle is detected with approximated aspect ratio (between 0.9 and 1.1). -It is important to assess values ofbubbleDiameterandbubbleFillThresholdproportional to the device resolution and image size. This was done by examining these values for various device configurations.
bubbleDiameter = 2 * getEstimatedBubbleRadius(answerSheetCropped.width())
bubbleFillThreshold = getBubbleFillThreshold(bubbleDiameter / 2)

//proceed with binary image now
val binaryImage = Mat()
Imgproc.threshold(
    answerSheetCropped,
    binaryImage,
    0.0,
    255.0,
    Imgproc.THRESH_BINARY_INV or Imgproc.THRESH_OTSU
)

val sheetContours: MutableList = ArrayList()
Imgproc.findContours(
    binaryImage,
    sheetContours,
    Mat(),
    Imgproc.RETR_EXTERNAL,
    Imgproc.CHAIN_APPROX_SIMPLE
)

//find MCQ bubbles in the sheet
for (sc in sheetContours) {
    val rect = Imgproc.boundingRect(sc)
    val aspectRatio = rect.width / rect.height.toDouble()

    if (rect.y > bubbleStartY && rect.width in bubbleDiameter..(2 * bubbleDiameter)
        && rect.height in bubbleDiameter..(2 * bubbleDiameter) && aspectRatio in 0.9..1.1) { //CIRCLE
        bubbleContours.add(sc)
    }
}
This small piece of code actually draws the circles over all the bubbles on the original bubble-sheet image.
//draw ALL bubbles on the answer-sheet
Imgproc.cvtColor(answerSheetCropped, resultMat, Imgproc.COLOR_GRAY2RGB)
Imgproc.drawContours(resultMat, bubbleContours, -1, Scalar(0.0, 255.0, 0.0), 5)
The image shows detection of all the bubbles (also shown in the app) –

Detecting filled-in bubbles
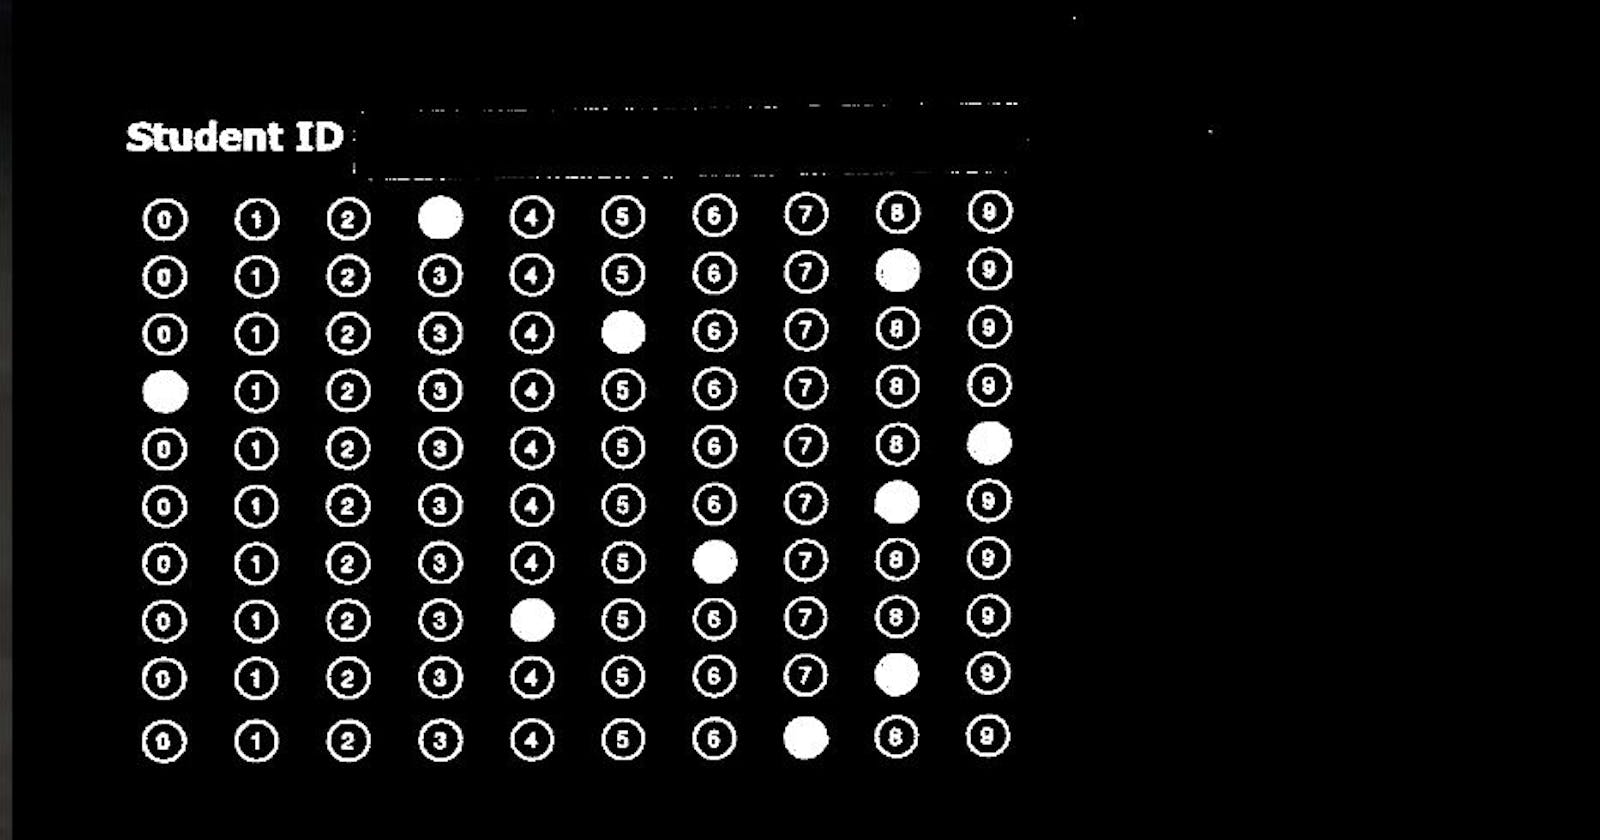
To detect a filled-in bubble, we check each bubble on the binary image (while masking other bubbles) and see if its pixel density is higher than the threshold (bubbleFillThreshold), which itself is less than the area πr² , where ‘r’ is radius of the bubble captured on the device resolution. This operation with OpenCV is resource intensive and takes some time – it would be much more resource efficient, and faster with vectorized Python code, but then I had to work within the limitations of Android platform. Anyway.
Here is the code-snippet that gets filled-in bubble index in a row –
private fun getFilledBubbleIndex(binarySheetImg: Mat, bubbleRow: MutableList, bubbleFillThreshold: Int): Int{
    var filledBubble: Pair? = null  //(index, pixelDensity)
    for(j in bubbleRow.indices){
        val mask = Mat.zeros(binarySheetImg.size(), CvType.CV_8S)  //mask to see filled-in bubbles
        val bubble = bubbleRow[j]
        Imgproc.drawContours(mask, listOf(bubble), -1, Scalar(255.0,255.0,255.0), -1)

        val outMask = Mat()
        Core.bitwise_and(binarySheetImg, binarySheetImg, outMask, mask)
        val nzPixels = Core.countNonZero(outMask)

        mask.release()
        outMask.release()

        if(nzPixels > bubbleFillThreshold){ //detect filled bubble
            if(null == filledBubble){
                filledBubble = Pair(j, nzPixels)
            }else if (nzPixels > filledBubble.second){ //darkest bubble of teh row
                filledBubble = Pair(j, nzPixels)
            }
        }
    }
    return filledBubble?.first ?: -1 //filled bubble not found?
}
Once index of a filled-in bubble is detected by computer vision, it can be easily mapped to the relevant number (0 to 9) or option (a, b, c, d,..etc) for further processing. Once the relevant data is extracted from the bubble sheet, it is a straight-forward Android app that can handle this data as desired.
The binary image below shows how the filled-in bubble detection works internally with computer vision. This image is never shown in the actual app, I am adding it here for better conceptual clarity –

I hope this explains and confirms that it is possible to build an OMR computer vision app using OpenCV on Android. Although, I’d once again reiterate what I said at the beginning – if possible, build OpenCV solutions with Python, that will save you lot of headache. :-)
